Simple Tutorial On How To Run Windows on Mac OS
Providing a simple tutorial
to run any windows programs on MAC OS based hardware PC's. Throughout
this article you'll get some very useful tips which you can be worthful
in future.
Windows is the most commonly used platform these days, and the most
popular reason for that is windows can be installed on any hardware, and
you may get shocked after listening this, ON MAC TOO
.
Why To Install Windows on Mac Hardware?
You may ask me why? And why should we install Windows on Mac Hardware,
there is no specific reason for that, because usually this question may
arise in minds of those who are using Mac OsX by the beginning, and
while coming to the one who starts using OsX after experiencing Windows
Platform, the one may feel difficult and somewhat lonely while
developing some relationship with OsX, and that too we can get each and
every program free of cost for Windows.
While coming to OsX we wont get applications for free all the time, we
need to spend some bucks for those, even MS Office for Mac OsX costs
roughly Rs.3000/- on app store. You may be a Huge fan of Mac Hardware
but believe me using a Mac hardware with windows installed on it makes
it so sweet. And i'll give you a simple demonstration to make it dead
simple.
We can do it with two ways,
#1. Using Pre-installed application Apple BootCamp,
#2. Using Parallel's Desktop.
So, for completing this task in a simple manner i'll do this with Apple BootCamp, So Let's begin the show,
STEP ONE: Bootable Windows ThumbDrive Creation
As Apple mostly focuses over the configuration at the same time over the design and weight, we will be missing our traditional Optical Disk Drives(ODD), So for that i have started default with creation of Windows ThumbDrive

#1. We need a USB drive having a minimum Capacity of 8GB, Insert it,
#2. Run the BootCamp assistant from Utilities Folder in Applications and proceed with Continue,
/Applications /Utilities,
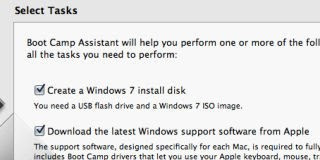
#3. Check the "Create a Windows 7 Install Disk" and "Download the Latest Windows Support Software from Apple" boxes and click continue.
So the process of ThumbDrive begins, and for your information if you do
this operation with an original windows disc, you don't need to check "Create a Windows 7 Install Disk" this.
#4. Next, browse for windows ISO image from you computer, and
note that this process is a time consuming one, so don't be frustrated
and don't do silly things like removing USB from port like those, which
corrupts your USB,
#5. After Completion Close the BootCamp Assistant.
STEP TWO: Hard disk drive Partition and Windows Installation
So, before proceeding for Windows installation one important task is
that we need to split up the Hard Disk Drive or Solid State Drive, what
ever it may be, because one partition for the original Mac that has been
installed previously and the other that hosts Windows, This step is
somewhat critical as if any thing happens wrong or in an hurry if you
delete any of the Mac OsX Libraries then the whole process will be a
Useless one, and again we may start from the installation of Mac OsX, so
while doing keep in mind not to don anything wrong. And for this Second
step too we are going to use BootCamp Assistant to make things easier
for us.

#1. Open BootCamp from Utilities folder and check "Install Windows 7 Box" and click Continue,
#2. Now we need to select the Size of our Partition, and for
windows 7 BootCamp needs minimum 20 GB, and also please hold in mind you
cant increase the size later,
#3. After having the ThumbDrive connected to our system, Click on Install ,
and partition process will start and during this process the system may
restart few times, hold your nerve and believe me there wont be any
issues, and soon you will see windows installation screen,
#4. This installation will remind you of the routine thing we do
for windows hardware, and when it ask to select a drive select a drive
named BOOT CAMP that we have created on step 2., so process as it is and after completion we will see our familiar windows 7 screen.
STEP THREE: Apple Driver's Installation
So, many of you knows that for windows 7 we dont need to install
drivers, but i'm reminding you again you are installing windows7 on Mac
Hardware, so there needs a installation of suitable drivers, so we are
going with Apple Driver's.

#1. Open our traditional Windows Explorer and then locate our
Windows ThumbDrive, and then open WindowsSupport folder and run
setup.exe,
#2. That Setup will install all the required drivers for the keyboard, trackpad, volume buttons, brightness buttons etc.
** So, again you may get a doubt that
"If i wish to run my Macbook over Mac OsX, then what should i do??"
There wont be any problem with that if you want to do so,
then just hold the Option key on your Mac keyboard while booting, then
it will ask you to select the operating system, on that time you can
make your desired choice,
Task Completed Cheer's !! Now you can Run your favorite Windows Programs on Mac, Now your Macbook is a CrossBreed of Windows and Apple, Enjoy,
Don't forget to share your Opinion and Once again i'm reminding you, if
any help needed please get in touch with us, We will be there to resolve
the issues.


